Take a Break from Sitting
Yoga Poses with Team FC Yogi, Mary Fennel
We all know that too much sitting can make us uncomfortable, causing tightness and soreness throughout the entire body, as well as mental fatigue. From an anatomical view it makes sense that we aren’t supposed to be in this position for long periods of time. When we are sitting all the muscles in our front body are being shortened while all the muscles in the back body are being lengthened. So when we sit for long periods of time, the muscles in the front body become tight and the muscles in the back body become over stretched, irritated, and inflamed.
For many of us, these effects can be felt after just one hour of sitting (sometime even less!). So imagine the damage that can happen after multiple hours a day every day of the week. Fortunately there is yoga!
Below are some poses to help counteract the effects of sitting. These poses are great for beginners as well as seasoned yogis. Personally, I’d recommend doing the following four poses (in order) as often as every hour during extended period of sitting. But doing something is better than nothing, so even if you only have a few minutes you’ll still get benefits. Additionally, if you can squeeze in a five minute walk before hand then you will see even greater results.

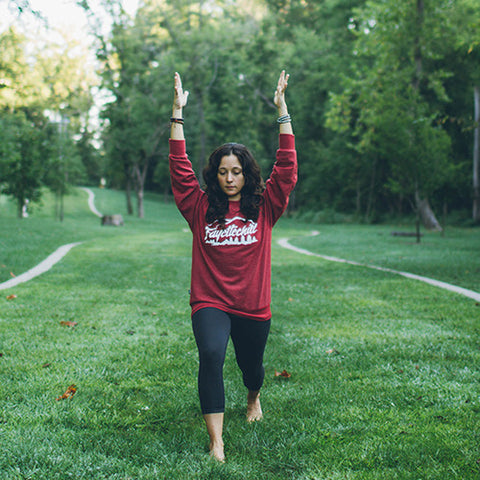
MOUNTAIN POSE (pictured above)
Purpose/Benefits: This foundational yoga pose helps to bring balance in the body. The goal is to align your body in a way that creates a sense of ease and lightness, in a way that’s not putting stress or pressure on any area. This is why Mountain Pose is considered the “correct” way to stand. Although it might seem unassuming, after sitting for long periods of time, standing in Mountain Pose with your arms reaching up can be extremely beneficial, as it lengthens the front body and is mentally refreshing.
How To: The goal of Mountain Pose is to align every part of your body to it’s neutral position so that you are completely balanced and symmetrical. Begin by standing with your feet hip distance apart making sure that your weight is evenly distributed on all parts of your feet. Keep a micro bend in your knees to avoid hyperextending or locking the knee joints. Find a neutral pelvis by rolling your inner thighs back, and then gently reaching your tailbone towards the heels. Lift your chest, roll your shoulders onto your back, and let your fontal ribs move down and in. Lift through the crown of your head, making sure to keep the back of the neck long.
Take 5 breaths here and then reach both arms up and spread the fingers. Press down through your feet as you reach up higher. Continue to draw the shoulders away from the ears. Take another 5 breaths then release the arms down.
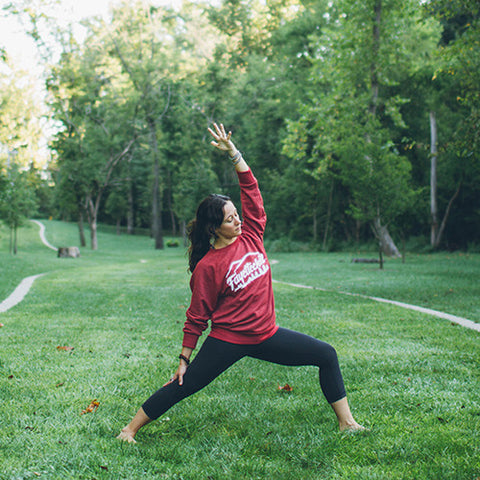
CRESCENT LUNGE (pictured above)


Purpose/Benefits: Crescent Pose is great for sitting because it opens your hip flexors, which are commonly very tight from sitting. Not only are tight hip flexors painful, but they can also lead to low back pain. This pose also builds strength in legs and core, opens your hips, and increases blood flow in your lower body. I’ve also outlined a variation of this pose which will feel wonderful on your shoulders and neck.
How To: From Mountain Pose step your left foot back about 3 feet, depending on how long your legs are. Make sure your feet are hip distance (think railroad tracks, not tight rope!). Bend your back leg slightly and align your right knee directly over your ankle. Keep your hips in the same line by gently hugging your right hip back and left hip forward. Reach your tailbone towards the ground and reach yours arms up, spreading your fingers apart. Lift your chest, broaden your collarbones, then soften your frontal ribs down into the body. After holding for at least 5 breaths, interlace your fingers behind your back, making sure as to not let your front ribs “poke out” too much. Hold this variation for another 5 breaths or so, then repeat everything on the other side. To come out of this pose step the back foot up to find Mountain Pose.

WARRIOR 3 VARIATION (pictured above)
Purpose/Benefits: Warrior 3 is great to counter sitting because it strengthens the legs, back, gluteals, and entire back body, which is constantly being over stretched from sitting and poor posture. Traditionally, your hands are reaching out in front of you in Warrior 3, but in this variation they are reaching behind you. This allows for more opening chest and shoulders, as well as a little more strengthening of the back.
How To: From Crescent Pose, begin to drop your chest toward your front thigh as you reach your arms back behind you (palms facing each other). Place your weight onto your front foot and pick the back leg up so that it’s parallel to the ground. Make sure your weight is evenly spread across the standing foot and keep a micro bend to your standing knee. Flex the foot of the lifted leg and reach back through the heel (it helps to imagine there is a wall behind you that you are pressing your heel into). Gently roll your lifted hip down to help keep both hips level with one another. Draw the shoulders away from the ears, reach back through your fingers, and squeeze your shoulder blades together. It’s very important to engage your core in this pose to protect your low back. To do so, reach your tailbone towards your lifted heal and bring the front ribs down and into the body.
If you feel like you need more support in this pose place your hands on the thigh of your standing leg (and possibly bend the standing knee deeper if it feels right). To come out bend the standing leg, set the back foot down to find Crescent Pose, then step the back foot up to Mountain Pose.
REVERSE WARRIOR 2 (pictured above)
Purpose/Benefits: This pose builds strength in the legs, stretches the side body, and opens the hips.
How To: From Mountain Pose reach your hands out so that your arms are parallel to the ground. Step your feet apart so that your ankles are directly below your wrists and your toes are pointing straight forward. From here, turn your right foot 90 degrees to the right. Turn your left foot just slightly to the right letting your left hip follow. Bend your right knee so that it aligns over the ankle. Make sure your weight is evenly spread across the bottom of both feet, and try and lift and engage the inner arch of your left foot so that it does not collapse onto the ground. Align your shoulders over your hips, lift your chest, reach your arms in opposite directs spreading the fingers apart. Look over your right fingers tips, flip your palms up and begin to reach up and back. Stop reaching back once you feel a stretch on your right side. Hold for 3-5 breaths. To come out, bring your arms back to parallel, straighten your front leg, turn your feet to they are parallel with one another, and step your feet back together coming into Mountain Pose.
Repeat on the other side. Enjoy!Photography by bentmatthews
Hello, as a newbie to cryptocurrency trading, I lost a lot of money trying to navigate the market on my own, then in my search for a genuine and trusted trader/broker, i came across Trader Bernie Doran who guided and helped me retrieve my lost cryptocurrencies and I made so much profit up to the tune of $60,000. I made my first investment with $2,000 and got a ROI profit of $25,000 in less than 2 week. You can contact this expert trader Mr Bernie Doran via Gmail : BERNIEDORANSIGNALS@GMAIL.COM and be ready to share your experience , tell him I referred you
I lost my job few months back and there was no way to get income for my family, things was so tough and I couldn’t get anything for my children, not until a met a recommendation on a page writing how Mr Bernie Doran helped a lady in getting a huge amount of profit every 6 working days on trading with his management on the cryptocurrency Market, to be honest I was skeptical at first but I took the risk to take a loan, and I contacted him unbelievable and I was so happy I received a profit of $15,500 with an investment of $1500 within 7 days of trading , the most joy is that I can now take care of my family, i am just sharing my testimony on here. I don’t know how to appreciate your good work Mr. Bernie Doran, God will continue to bless you for being a life saver I have no way to appreciate you than to tell people about your good services. He can also help you recover your lost funds, For a perfect investment and good return on investment contact Mr Bernie Doran on Gmail : Berniedoransignals@gmail.com his telegram : IEBINARYFX or his whatsApp : 1 ( 424 ) 285 – 0682
Leave a comment